Update
Please follow this guideline to update your Plugin in an existing installation.
Getting the latest version of plugin
Download the latest version of the plugin, see installation - Getting the plugin.
Verify your installation
Before updating your installation, we recommend to double check that you previously followed the recommendations for the installation. Some recommendations have been updated with recent releases.
Save your certificate
Make sure to backup your certificate in a safe place before you perform any update.
Your current certificate may be in the modules' folder and may be lost if the folder is replaced in full during the update.
You can find your certificate path in the Configuration screen labelled as "Authentication file".
The certificate file typically has a file ending .pem.
Backup your certificate from the given path.
If you accidentally lost the certificate file, maybe by overwriting, request a new certificate via YellowCube Support.
Method A: Manual replacement
This method is recommended for professionals and works if you have access to the filesystem of your server with tools like ssh, FTP.
After saving the certificate file, delete the plugin folder wooyellowcube inside the wp-content/plugins directory. Do not disable the plugin.
Double check that there is no other outdated "backup" copy of the plugin in a renamed folder as this can lead to strange bugs. If you want to keep any old version of the plugin, move it out of the WordPress installation folder.
Extract the downloaded .zip file, into a new folder wooyellowcube. Make sure there is no additional nested folder and index.php is directly contained.
Move the new folder, containing the new version, to the installations' wp-content/plugins directory.
Recover the certificate in the modules' folder with the same filename.
Login to WordPress and check the YellowCube logs for the database update message, see blow.
Method B: Using the admin interface
This method works if you are a WordPress administrator and the web server has write permissions, even if you have no direct server access with tools like ssh or FTP.
After saving the certificate file, you will package the downloaded .zip with your certificate file to make it work with the admin interface installer.
Rename the file wooyellowcube-master.zip to wooyellowcube.zip.
Open the file wooyellowcube.zip with your favorite archive program and rename the containing folder wooyellowcube-master to wooyellowcube.
Enter the folder wooyellowcube in the zip repository and drag-and-drop the previously saved certificate file from the file explorer.
Save the archive and double check that the folder is renamed and the certificate is contained.
Go to the "Plugins" area in WordPress.
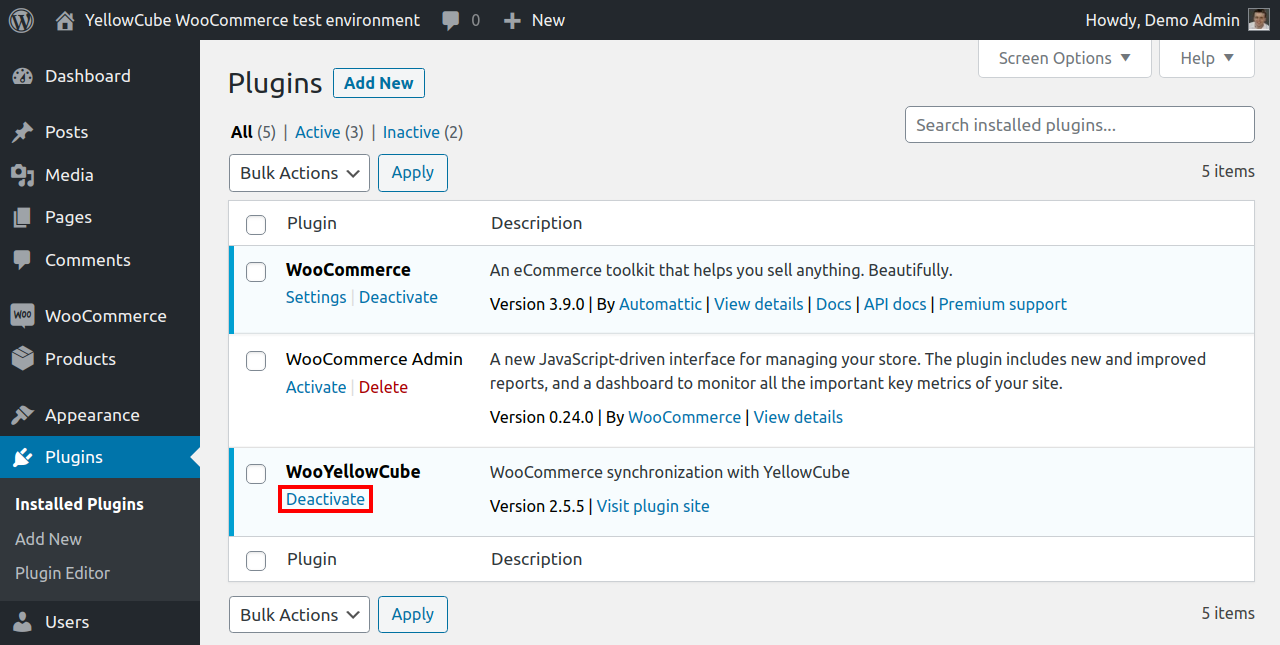
Then identify the plugin "WooYellowCube" and click "Deactivate" and next "Delete" and confirm.

On the Plugin header click "Add new" and then "Upload Plugin".

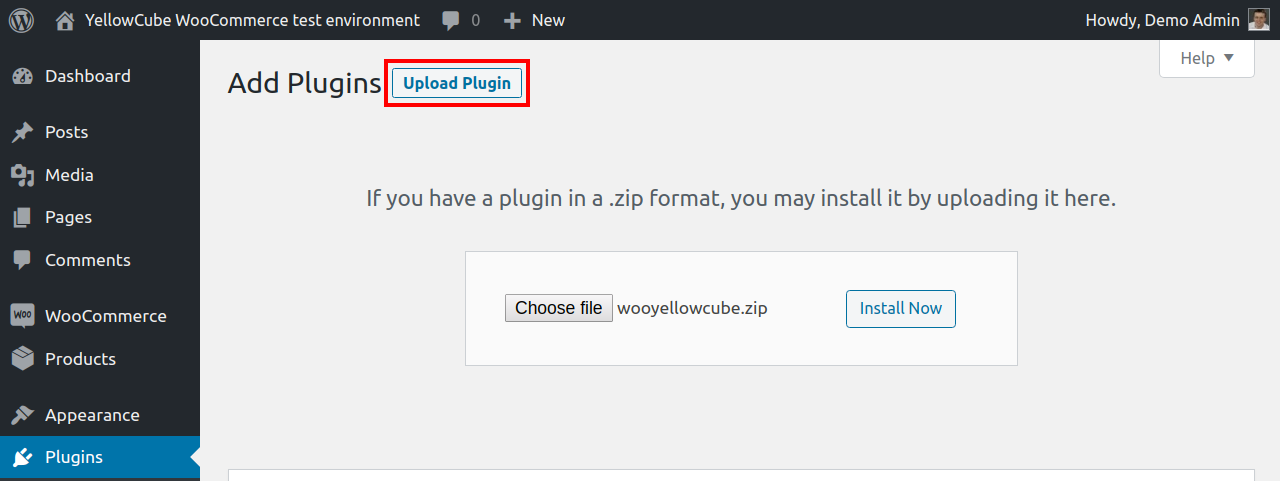
Then "Choose file" and browse for the prepared wooyellowcube.zip, select and click "Open" (might vary depending on your system) and then "Install Now".
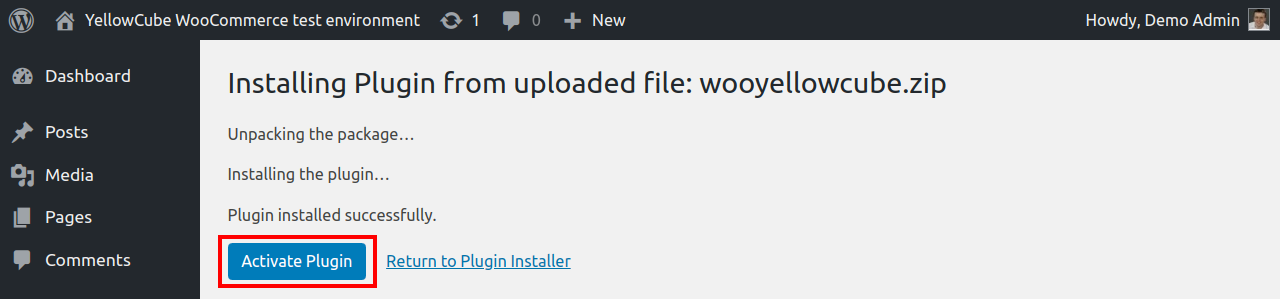
Finally click "Activate Plugin" to finish the installation.
Login to WordPress and check the YellowCube logs for the database update message, see blow.
Always test after updates
Make sure to test the connection after any update.
We recommend you to go to the "WooYellowCube" configuration page and hit "Save information".
Then check the stock table with "Force to refresh inventory" and click "Execute". If YellowCube already has your goods on stock, the list will be provided.
Additionally, we highly recommend you to check updating a product and place an order to make sure everything works as expected.
If there is an unexpected error message, first double check the certificate path and filename matches the configuration.
New in latest 2.5.5
The version 2.5.5 contains many bugfixes, stock management improvements and compatibility with WordPress 5.0+ and PHP 7.2.
Recommended to setup dedicated Cron
The plugin has now improved support for setting up a dedicated cron for stability and better performance. We highly recommend setting it up. See installation - Cron for background processes.
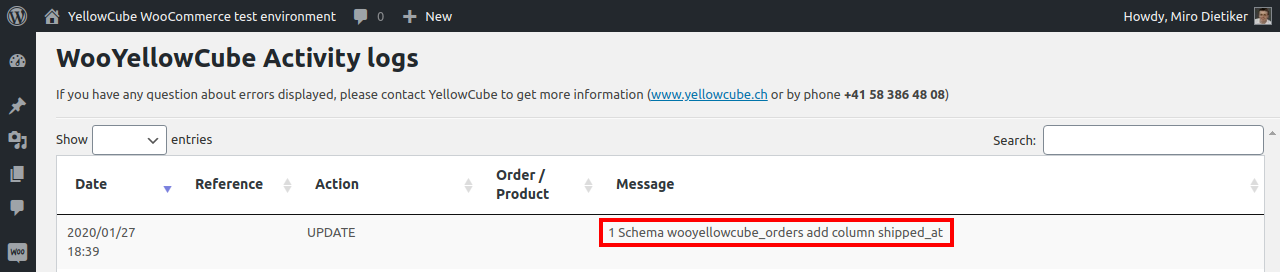
Automatic database update
Version 2.5.5 will perform a database schema update on the first page request to your WordPress administration.
A successful schema update will be reported in the activity log as "1 Schema wooyellowcube_orders add column shipped_at".